Using Loans in ERPNext
Guide
In ERPNext, you can setup loans which can be payable on a given number of periods and a specific number of time. Amortization and payment schedule can be setup as well per employee. A loan can also be deducted from employee's salary.
First thing that needs to be done is to create a Loan Type. This varies depending on what type of loans are applicable for each company.
Create Loan Type
1. Login to ERPNext.
2. Go to Human Resources. Under Loans, click Loan Type.
3. Click New to create a new Loan Type.
4. Fillup the Loan Type information as needed.
5. Click Save to create the Loan Type.
Applying for a Loan
Employees can file for a loan through ERPNext or the HR may encode the loan on behalf of the employee. This depends on the systems implementation per company. To submit a loan application in ERPNext:
1. Login ERPNext.
2. Under Human Resource, go to Loans and click Loan Application.
3. Click New.
4. Fillup the necessary information:
Applicant Name - Name of the employee applying for the loan
Posting Date - Date the loan will be posted.
Status - Status of the loan application (Open, Approved, Rejected). Only Approved loan applications will be processed in the system. Approver accounts for department heads, supervisors can also be setup with the User Permission access roles.
Loan Type - Which type of loan is being applied for. Only Loans created under Loan Type will be displayed here.
Loan Amount - Amount being borrowed (does not include the interest)
Required by date - Target date the loan is needed to be released / approved
Reason - Description or additional info why loan is needed.
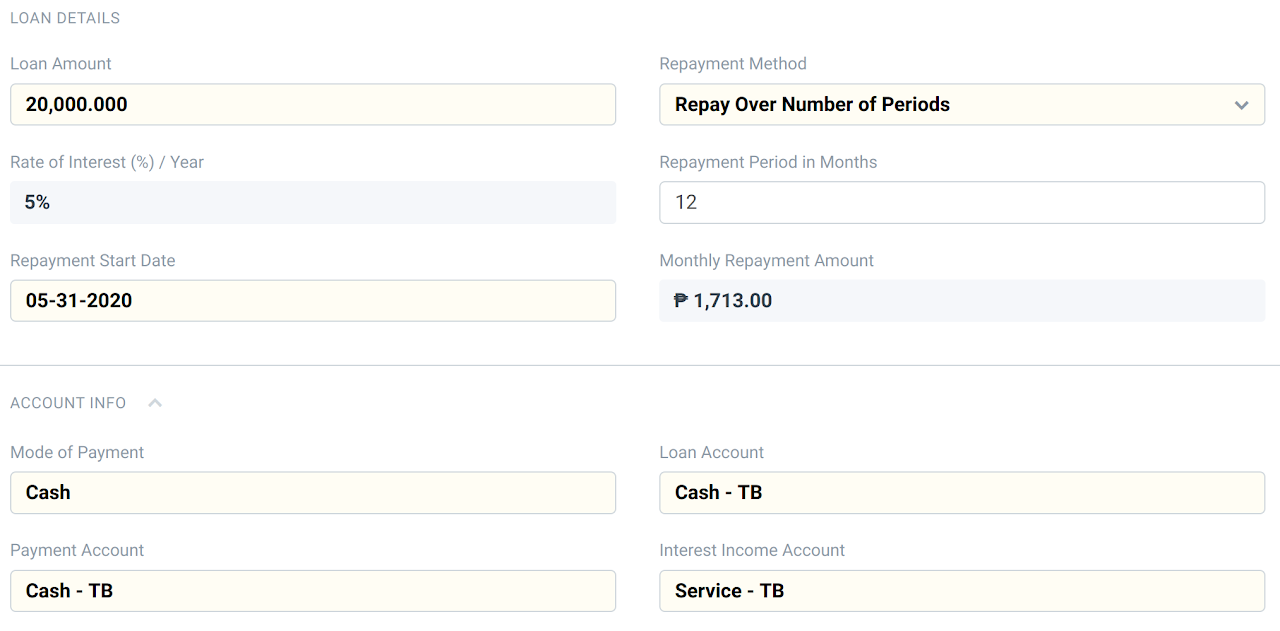
Repayment Info - Select whether payment is per fixed amount or per month. If Repay fixed amount per Period is selected, the loan applicant will need to input the monthly loan payment. The duration or the number of payment periods will be computed by the system.
If Repay Over Number of Period is selected, the loan applicant will need to input the Repay period in months. The amount payable per month will be computed by the system.
Total Payable Interest - This is computed by the system based on the yearly interest rate percentage defined per loan type. Take note that the interest amount is automatically recalculated/adjusted every after loan payment. If your loan interest is fixed, it is better to have the interest rate set to 0% and just set
5. Click Save to create the loan as Draft.
6. Click Submit to finalize.
Repayment Schedule
1. If the Loan Application status is Approved, click the "Create Loan" in the upper right part of the screen. Enter the following information:
Repayment Start Date - Start of loan payment
Mode of Payment
Payment Account - account where the loan payment will be logged
Loan Account - account where loan amount will be logged
Interest Income Account - account where the interest amount will be logged
2. Click Save. The Repayment Schedule will be auto populated. Details of the monthly loan payment and balance will be displayed.
3. On the Totals section, running total and balances of the loan will be displayed. This will be automatically updated based on the payments made.
4. If loan payment is to be deducted from employee's payroll, tick the "Repay From Salary" box. Loan will be included in the employees deductions.
5. Click Submit to finalize.


